Using Port Forwarding for VoIP to overcome NAT issues.
Port forwarding, sometimes referred to as tunneling, is a method of opening a port or ports in a router or firewall to allow communication from a party outside the network. Port forwarding is the act of actually forwarding a network port from one network node to another. This enables an external source to reach a port inside the private LAN from the outside through a NAT-enabled router and can solve many instances of one-way audio.
For VoIP connections, opening specific ports for traffic, allows two-way communications accessible regardless which side initiates the call. Also called “port mapping”, port forwarding can be accomplished by setting manual configurations in most routers, even smaller home routers like Linksys. Port forwarding can solve NAT related issues that result in one-way audio, registration problems, or even no audio at all.
Setting Port Range Forwarding on a Linksys.
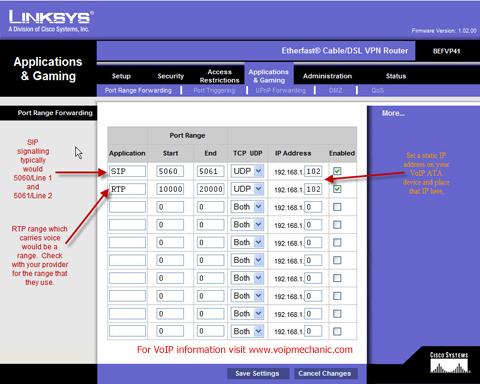
To enable port forwarding Log into your router and navigate to the Applications and Gaming page, then click on Port Range Forwarding. The Port Range Forwarding is where you can designate ranges of ports to automatically be assigned to a device, in this case the VoIP ATA. The IP address of the ATA should be set to a static address which will be the address used to forward.

*Note: You will want to have obtained specific information from your VoIP provider, including the SIP signaling ports (typically UDP ports 5060 and 5061) and the RTP port range that their service uses to negotiate for voice traffic (These port ranges are also UDP, but may vary in range.). Additionally find out if any other additional ports would be required for their service.
To add a VoIP ATA device using forwarding:
- Enter an Application name of the service you want to forward, in this case we are forwarding SIP and RTP, so that is what we picked as names.
- Enter the Port Range Start and End of the service you want to forward.
- Select the protocol used by the services (In most cases UDP would be the protocol of SIP and RTP.).
- Enter the static IP Address of the VoIP ATA device.
- Select Enabled for that entry. Click the Save Settings button.
After you configure your Port forwarding we suggest that you might want to test your phone connection after completing a power cycle of the ATA. This will allow for a registration process with the ATA reaching out and downloading a configuration file from your provider, which should result with dail tone to the ATA. Then make and outbound call, as well as make a call inbound to your connection.
